Pages

Showing posts with label DIY. Show all posts

Monday, October 14, 2013

Halloween Decor and a Festive Frame

How is it Monday already?!  It was another low key weekend here in Kentucky!  A lot of relaxing and I was able to finish start putting out our sparse halloween decor.


I had the metallic pumpkins left from last year to set out, as well as a few extras I scored from Hobby Lobby on clearance after Halloween a year ago!

I actually forgot that I purchased this great black and white chevron frame last year, and was SO EXCITED to find it in my Fall Decor box.  I decided to embellish it just a tad to make it a little more festive!

It is amazing what a few wooden letters and a little paint can do!


I think it'll be fun to change out year-to-year with a picture of the kids in their costumes.  And by kids, I mean the dogs.  Two possible contenders? A hot dog or shark.  Both might be in the mail already from Shutterfly...


Have y'all decorated for Halloween yet, or am I just late to the game?  I'm going to guess the latter.

Sunday, January 27, 2013

C-A-T-S Cats! Cats! Cats! {DIY Burlap Bunting}

We are right in the middle of basketball season, and if you know us, you know we L.O.V.E. Kentucky basketball in our house!  Our Saturdays and the occasional weeknight are planned around what time the Cats play.  Whether its just the two of us watching the game or with a group of friends, I try to keep things festive on game day!

If you check out my Pinterest boards, you'll see that I've been loving on banners and bunting.  I thought a festive UK bunting would make a great addition.

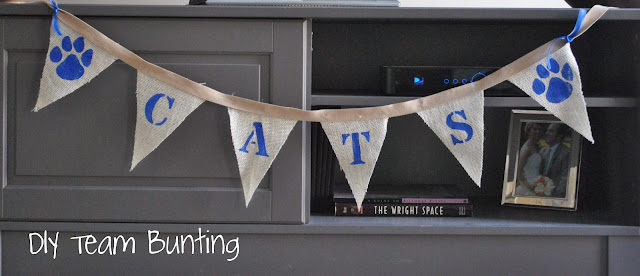
DIY game day bunting

Let's back up--I started out by gathering all of my supplies at Joanne's.

DIY banner supplies

Burlap {or other choice fabric}
Acrylic Paint & Foam Brush
Wide Ribbon
Decorative Ribbon {optional}
Stencil
Sewing machine or Liquid Stitch

I made a quick triangle template out of scrap paper, and used a rotary cutter to cut out the burlap.

banner triangle template


I created my stencils the same way I did to label our closet bins.

make your own stencil

Hold the stencil down & dab the paint onto the burlap with the foam brush.

DIY stencil


After the paint dried, I used Liquid Stitch {more on this stuff later!} to attach the painted burlap triangles to the wide ribbon.

liquid stitch

I added a little extra decorative ribbon at the ends of the banner & that was it.  Seriously simple project! I'd like to think it helped with the W on Saturday {still too close for my liking!}

university of kentucky game day bunting


So glad our fifth house's Dog Days of Winter Challenge suggested I stop pinning and start doing!  I love how this turned out!

Wednesday, January 16, 2013

Thrifted Buffet

Not so long ago, I had been stalking yard sales & Craigslist searching for a buffet to put in the kitchen. We needed something {other than the random console} along the big, empty wall. Anddd we need a little extra storage for our "not-every-day dishes." Note to self: next house must have more cabinets and a dining room. I lucked out and found one pretty fast on Craigslist, at a great price--$50!

When we picked it up, it was painted in a matte black with a bunch of silver knobs. Check out the two knob "pulls" on the drawers. Creative, but not my style.

craigslist buffet

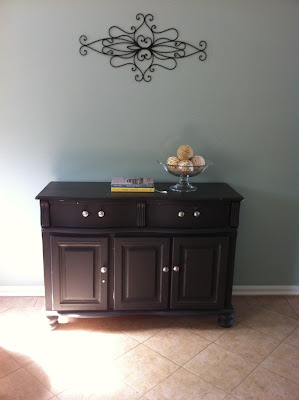
Since the kitchen is so bright with the white cabinets and light walls, I kept the buffet black. I freshened it up with a coat of semi-gloss, and decided to strip the top surface & stain it to match the kitchen table, which actually reads a little darker than the picture.

thrift buffet

craigslist thrift buffet

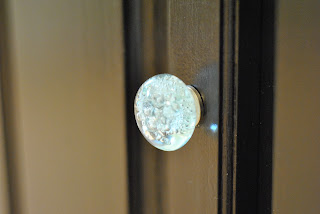
I quickly found out why the previous owners had two knobs in place of an actual drawer pull. The holes were placed 3 1/2" apart, and virtually every hardware store I visited only had 3" pulls. Thanks to Amazon, I finally found 3 1/2" pulls! I also found these great glass bubble knobs at Hobby Lobby, that match the wall color. I think they're a fun, expected touch!

glass bubble knob

I have been meaning to share this great thrift for awhile--thanks to Our Fifth House's Winter Challenge for reminding me!

Tuesday, January 15, 2013

DIY Stenciled Bins

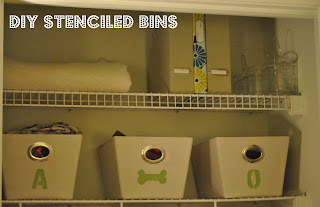
Yesterday, I posted about our freshly organized coat closet.  I got a great deal on the three canvas bins from Home Goods {$4 each!}, but I wanted to be able to distinguish our bins easily, so I decided to add a quick stencil to each.  I printed out the letters in Word, and used an exacto knife to create the stencil.  I Google'd "dog bone clipart" to create the bone stencil for the pups' bin, and cut it out the same way.


I held down the stencil with one hand, and used a foam brush to lightly dab the paint onto the canvas bin.


Ta-da!  Labeled bins!


Monday, January 14, 2013

I'm a closet organizer.

One of my 2013 goals {I'm not good at keeping resolutions} is to get more organized.  Things are pretty organized around here to begin with, but there is always room for improvement!  One little area that needed some extra attention was our hall closet.  So often things get shoved in the closet, or thrown up on a shelf.  Before you know it, its out of control.  A quick trip to Home Goods for a few baskets & bins took our entry closet


A large basket at the bottom holds a few pairs of shoes we wear often & I added a hook on the inside wall where I can hang my purse and work bag.  I'm famous for just hanging them on the outside facing knob!  Now, they have a home.

I stenciled our initials on each of the bins that hold our hats, gloves & scarves.  The dog children also share one with their leashes, toys and etc.

DIY Stencil canvas bins

The top shelf now keeps all of our random household items in one central location. Magazine holders now store miscellaneous warranties and manuals.  Our home management binder {that mysteriously travels from one location to another in the house} has an official home!

Its amazing the sense of accomplishment you get from getting one little space organized.  Thanks to Our Fifth House's Winter Project Challenge for kicking my rear into gear!

Tuesday, December 4, 2012

Christmas Crafts

During our Christmas Craft Day, I added two sweet Christmas decorations to our collection--here are the details on how they came to be.

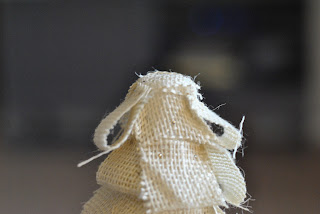
First, the Mini Burlap Tree:
DIY burlap tree christmas

I found this cute little burlap tree on Pinterest via See Kate Blog.  I didn't see any how-to instructions, but it looked pretty self explanatory.  I cut strips of burlap to about 1ish inches in width and about 2-3 inches long {I opted out of measuring...}

burlap how to

Fold each piece in half, with the loop towards the base and attach to a Styrofoam cone, starting at the bottom {I used regular 'ole straight pins}  Go all the way around the bottom, and work your way up to the top of the cone.
DIY burlap christmas tree

Once I was almost done, I took a small piece of burlap and covered the top of the cone before I put the last row of loops on.  Add on the final loops at the top,

DIY burlap tree how to

Voila! You've got yourself a little tree.


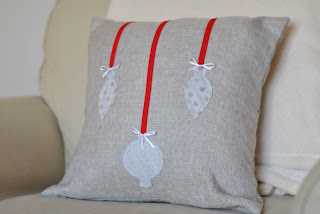
AND the pillow!  How easy is this?!  This pillow found me via the Joss & Main app on my phone.  I loved it, but knew I could probably make it myself for less than $18.95 + tax and shipping.


I went to Hobby Lobby and found this pillow cover.  Its was the right color and the right size--minus the buttons:


Flip it over, and you've got a solid pillow cover for $7, zipper and all {find a coupon}.  I went to Joanne's and found two quilting quarters for less than $4 and some bright red ribbon.


I used my ornament cookie cutters to trace the design onto the fabric and then cut 'em out.

ornament pillow

Get some fabric glue, stick everything in place, and let dry for an hour.  BOOM, pillow complete:

DIY ornament applique christmas pillow

I love the new additions to our holiday decor.  It's beginning to look a lot like Christmas around here!

I'm linking up to Hyphen InteriorsThe Winthrop Chronicles,  and Hi Sugarplum! for their Christmas Craft Parties!  


Sunday, October 16, 2011

The Green Room

I am finally getting around to finishing up the third bedroom!  Right now, its serving as an office/craft/misc. room! So I decided to go with something bright and fun:

Before:


After:


The new stencil & desk that O built!!


I do think that the valance is a little too busy to go with the Moroccan wall stencil, so that may be coming down.  The only thing left to do is paint the desk and find a chair (this one is temporary & not comfortable!)

Sunday, July 31, 2011

Kitchen Progress

After 10 days, 4 coats of cabinet paint, 2 coats of wall paint, a new dishwasher and staying up until midnight finishing window treatments, the kitchen is moving right along!

Kitchen Before:

After:


HUGE improvement!  I love the white cabinets!  Over time we hope to replace the stove & fridge and put up a white subway tile backsplash.


Since the Living Room and Kitchen are open to each other we added pillows in the same sea glass tone as the kitchen paint color:


Living Room Before:


Living Room After:
Izzie loves the new decor!

View from Front Door


I found this cute side table at Home Goods for $75!  I've been looking for a cute little table to go with the chair!


love, Love, LOVE all the changes we've made so far.  Now, I'm ready for a break!
Related Posts Plugin for WordPress, Blogger...